
Choose the connection that fits you
Connect Instagram, without guessing.
MonsiSocial Cloud is the recommended guided route for the commercial release. Self-managed remains available for experts who want their own Meta app and storage.
Guide version 1.1 · updated 3 November 2026
MonsiSocial Cloud
The app guides you through subscribing, Instagram's official sign-in, choosing the exact account and automatic verification.
- No Meta developer app to create.
- No App Secret, bucket or storage keys to copy.
- Approved media is hosted only briefly for publishing and then removed.
- One harmless test post proves the route before you schedule a batch.
Self-managed
Use your own Meta developer app and private S3-compatible storage. Follow the illustrated steps below in order.
- No MonsiSocial Cloud subscription.
- Your Meta secret, token and storage keys stay on your Mac.
- Best for technical users who want full infrastructure control.
Check the requirements first
- macOS 14 or later and the current MonsiSocial version.
- An Instagram account you are allowed to manage.
- That account must be Business or Creator—not Personal.
- A Meta developer account with phone or identity verification completed when Meta asks.
- Your own S3-compatible storage endpoint reachable through public HTTPS. Cloudflare R2, Amazon S3 and compatible servers can work.
- Your Mac must be awake and online when a scheduled post is due.
Change Instagram to Business or Creator
- Open Instagram on your phone and switch to the exact account you want to publish to.
- Open the profile menu, then Settings and privacy.
- Open Account type and tools or For professionals. Instagram may rename this menu.
- Choose Switch to professional account.
- Choose Creator for a person/creator profile or Business for a company or brand.
- Finish the prompts. Connecting a Facebook Page is optional for the Instagram Login route used by MonsiSocial.
Create your own Meta developer app
- On your Mac, open Meta for Developers → My Apps.
- Sign in with the Meta account that manages the Instagram account. Complete any developer registration or phone verification.
- Choose Create App.
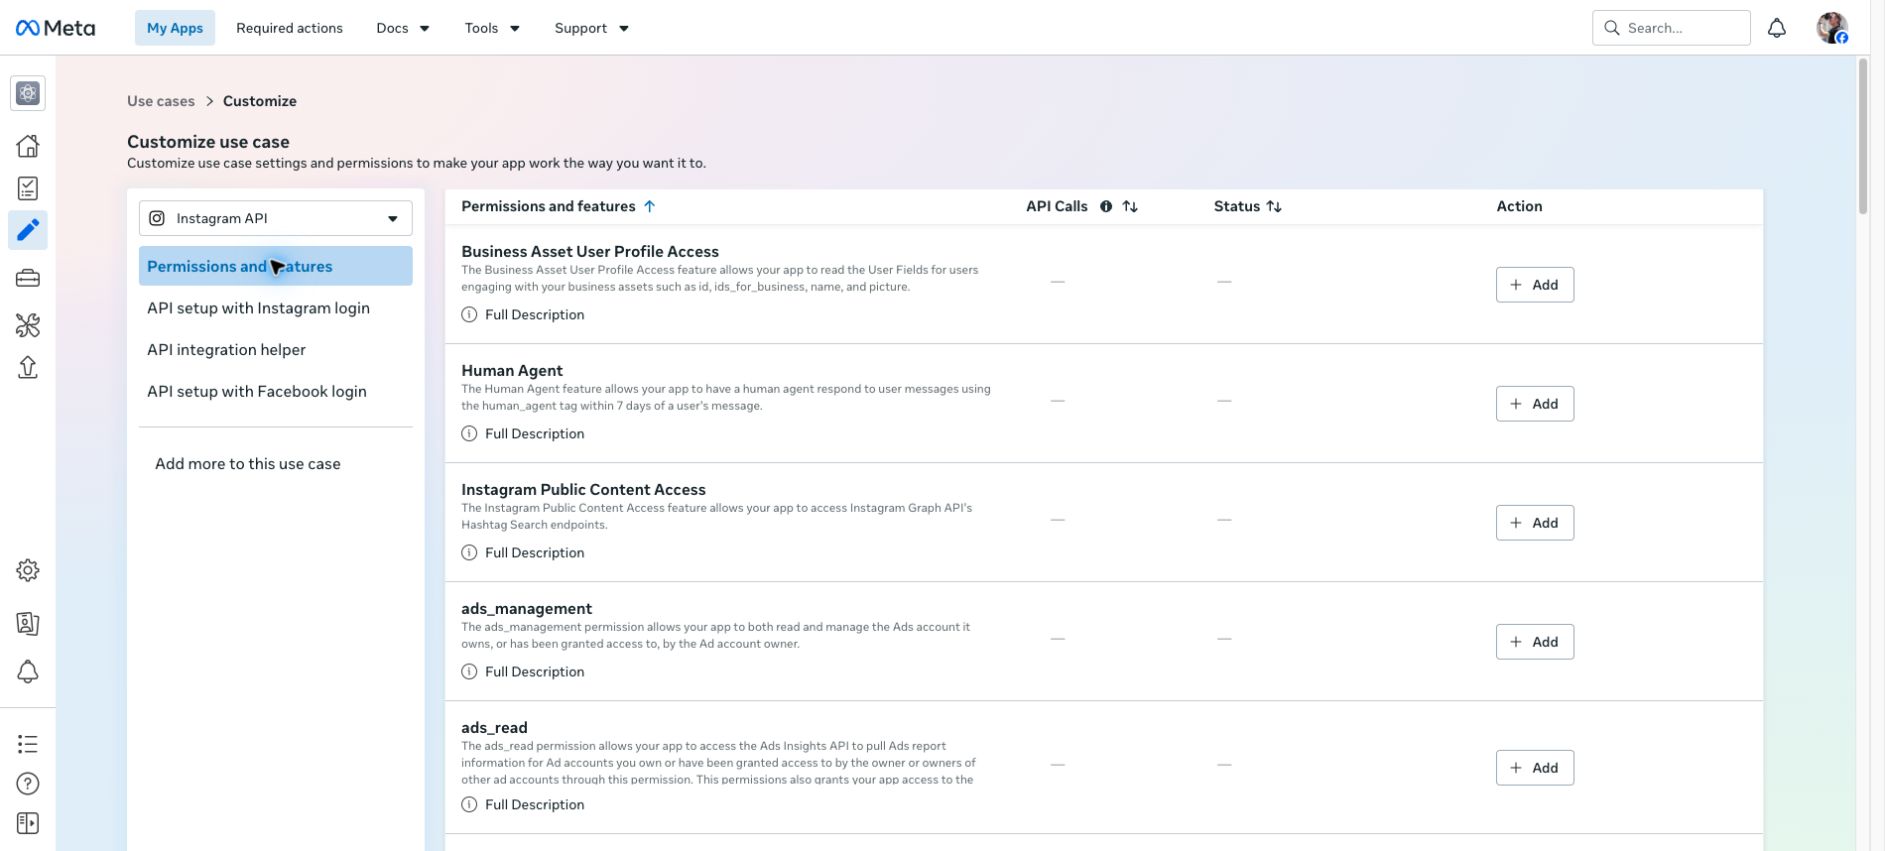
- Select the use case for managing Instagram content, sometimes shown as Access the Instagram API or Manage messaging and content on Instagram.
- Name the app, for example MonsiSocial Local — Instagram.
- Finish creating the app. Do not enable unrelated products or permissions.
Configure Instagram Login exactly
- Inside the Meta app, add or open Instagram API with Instagram Login.
- Open its API setup or Business Login settings.
- Add this exact redirect URI:
https://monsieursmade.com/monsisocial/oauth/instagram/ - Enable only these permissions:
instagram_business_basicandinstagram_business_content_publish. - Save the changes in Meta before leaving the page.
- If Meta asks for a deauthorize or data-deletion URL, use the support/privacy links supplied in the Meta setup screen and follow Meta's current validation instructions.
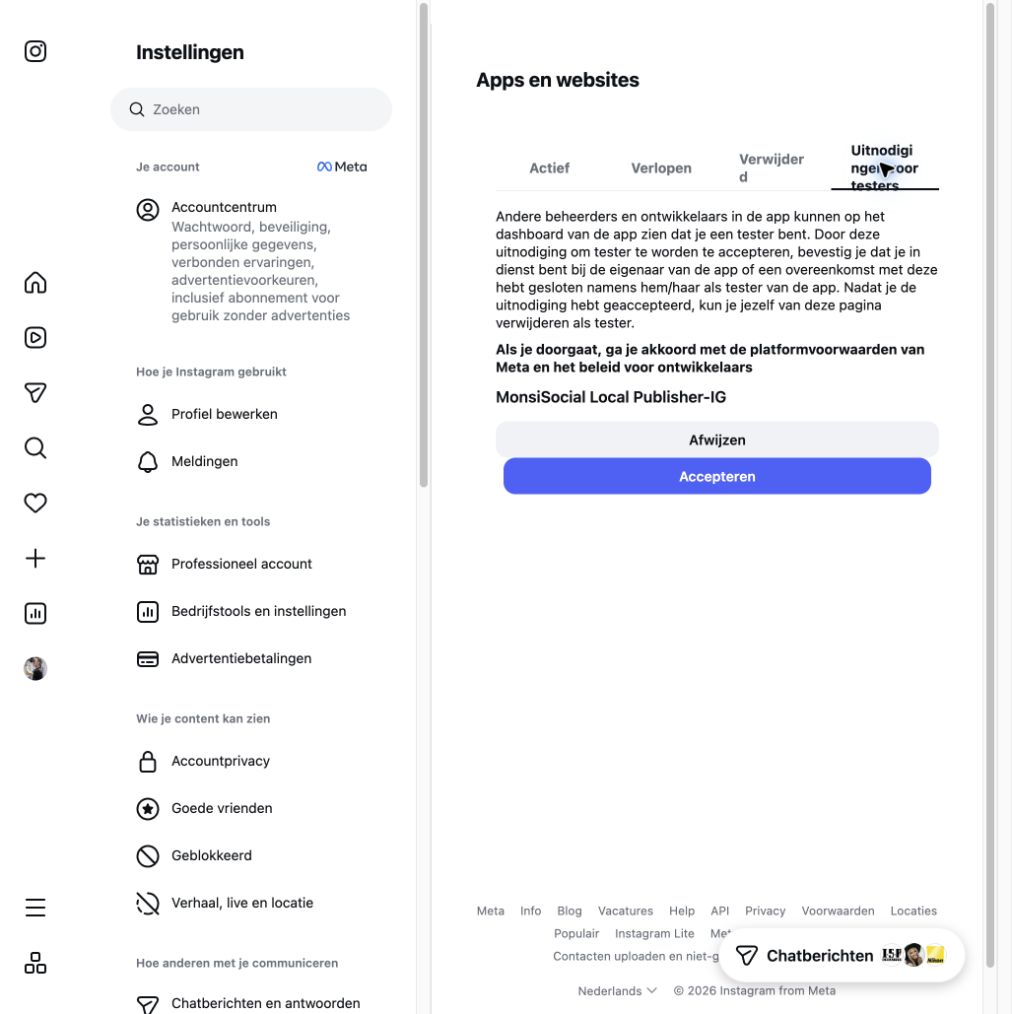
If the account is not available during testing
While the Meta app remains in Development mode, only app administrators, developers and accepted Instagram testers may authorize it. Add the Instagram account under app roles/testers if needed, then open Instagram's Apps and websites invitations and accept the invitation before reconnecting.
Copy the two correct values into MonsiSocial
- In Meta, open the Instagram product's app settings.
- Copy its Instagram App ID or Client ID.
- Reveal and copy the matching App Secret.
- In MonsiSocial choose Connections → Set Up Instagram.
- Paste the ID in App ID / Client ID and the secret in Meta App Secret.
Connect private temporary media storage
Instagram's official API cannot read a photo directly from your Mac. It briefly needs a public HTTPS URL. MonsiSocial therefore stages an approved file in your own restricted storage and removes it after publication or expiry.
- Create a private bucket with an S3-compatible provider or server.
- Create a dedicated access key that can read, write and delete objects only in this bucket or prefix.
- Set a lifecycle rule that deletes staged objects after 24 hours as a second safety net.
- In MonsiSocial enter the S3 endpoint, region, bucket and a private path prefix such as
monsisocial/instagram. - Paste the dedicated access key and secret. They go to macOS Keychain.
- Click Save & Test Private Media Transfer. The test uploads one tiny probe and never creates an Instagram post.
| Field | What belongs here | Common mistake |
|---|---|---|
| Endpoint | The provider's S3 API HTTPS endpoint | Using a dashboard or file-browser URL |
| Region | The exact S3 region, or the provider's documented value | Guessing a nearby region |
| Bucket | The bucket name only | Pasting a full URL |
| Path prefix | A dedicated folder-like prefix | Sharing a broad root used by other apps |
| Local NAS address | Optional local IP/host only when hairpin access fails | Using it as Instagram's public URL |
Connect, verify and publish one test
- Click Save & Connect Instagram.
- Your browser opens Instagram's official authorization page. Confirm the exact username before choosing Allow.
- The secure return page opens MonsiSocial again. If it does not, return to MonsiSocial and use Open Instagram Sign-In.
- Wait for Ready: Approve is now the last human step.
- Import one non-sensitive test image, drag it to a time a few minutes ahead and select the connected Instagram account.
- Add a caption, approve it, keep the Mac awake and watch the queue.
- Confirm the post appears once on the correct Instagram account before scheduling a batch.
Troubleshooting without risking the account
| You see | Check this first |
|---|---|
| Invalid request / redirect mismatch | The redirect in Meta must be exactly https://monsieursmade.com/monsisocial/oauth/instagram/, including the final slash. |
| App ID is rejected | Use the Instagram product's App ID/Client ID, not a tracking ID, Page ID or another Meta app. |
| The wrong Instagram account appears | Cancel, sign out of Instagram in that browser if needed, then use Reconnect / Change Account and verify the username before allowing. |
| The account is unavailable | Confirm it is Business/Creator and, in Development mode, that its tester invitation is accepted. |
| Private media test fails | Check endpoint, region, bucket, restricted key rights, HTTPS certificate and whether the bucket route is reachable from outside your home network. |
| Approve stays disabled | Read the sentence directly below the button. It names the missing caption, time, account, connection or first-comment requirement. |
| A scheduled post waits | Wake the Mac, restore internet/storage access and open MonsiSocial. It safely catches up instead of reporting a fake publication. |
| Meta asks again later | Tokens can expire or permissions can be changed. Use Verify Connection; reconnect only when MonsiSocial says attention is required. |
If the problem remains, email info@monsieursmade.com with the macOS version, MonsiSocial build, exact step and a screenshot that contains no secrets.